

|
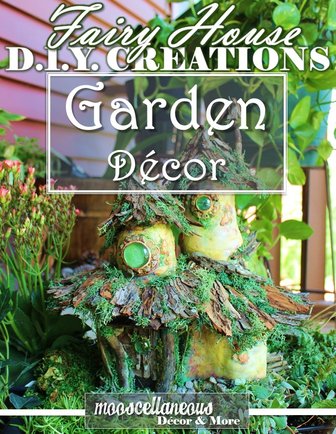
My favorite part of spring is getting outside and soaking up the sun's warmth, and nature's smells. This year I've loved messing around in my garden. Although the space is small it's producing so much that I'm convinced there have been some fairy helpers.
So I decided to finally pull out all those fairy house photos on my Pinterest board and try one. I also discovered how addicting YouTube tutorials can be, so my first idea morphed into something completely different. I also learned through this project that time-lapse can be very misleading for time management. There are so many types of fairy houses, but I chose to work with natural elements and polymer clay, taking on the clay as a new challenge, and boy did I ever. I'll tell you what I learned not-to-do along the way as well as a few tips and tricks. |
|
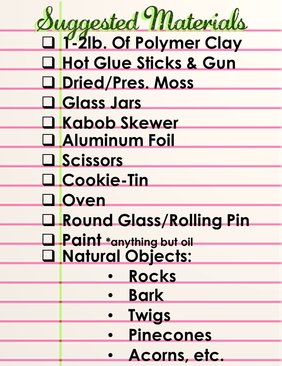
Step 1: Gather Your Materials
Find some glass jars to act as your base structure, give them a good wash and make sure they are dry. I used a Crown Royal bottle, organic juice jar, disposable wine glass goblet tops, and a plastic water bottle. However, I no longer recommend using plastic for first timers. *I have seen some tutorials where certain types of plastic bottles were used and I attempted to use one for the smallest round in this one and the turrets, but it melted and warped shape inside the oven. Go for a walk in the park or your backyard to collect FREE natural items that will appeal to your local fairies. There are so many things that can be used such as twigs, bark, rocks, pine-cones, acorns, gravel, marbles, sea glass, broken bits of jewelry, beads, etc... Get more than you think you will need especially for whatever you plan on using for your roof. I chose bark and wanted it to fit snugly around my bottles so I wanted several pieces to work with. |
|
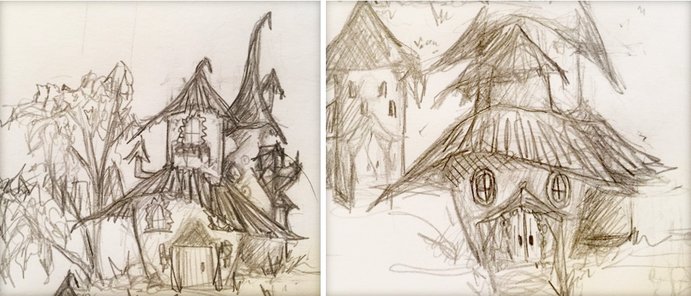
Step 2: Design Your House Layout
There are countless options available to you. Just use your imagination and know that typically things never turn out exactly like you designed going in. You will make tweaks and changes based on materials, just so long as you have a general idea going into it as to what you want your finished look to be. I wanted to work with the lines and indentations already on the bottles to create some stained glass windows.
Move them around to find the best composition and take a picture to reference so you know where everything goes when you start to attach everything.
Step 3: Set Up Your Work Space
I discovered that a what I thought would be a 2 day project turned into a week due to learning curve mistakes, and getting caught up in the creative touches. It's nice to have a place where you can leave everything to sit for a while to view all items you have to choose from. I preferred to build my house on a foil covered cookie-tin so I could easily turn and lift it, and to make it easier to put in the oven for baking.
*Don't forget to have some paper towels or a rag on hand just in case.
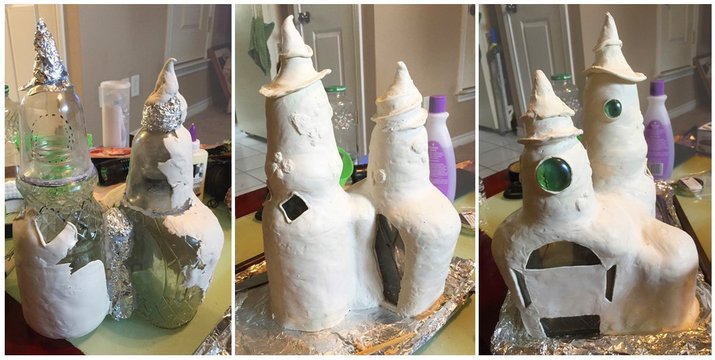
Step 4: Glue Your Structure Together
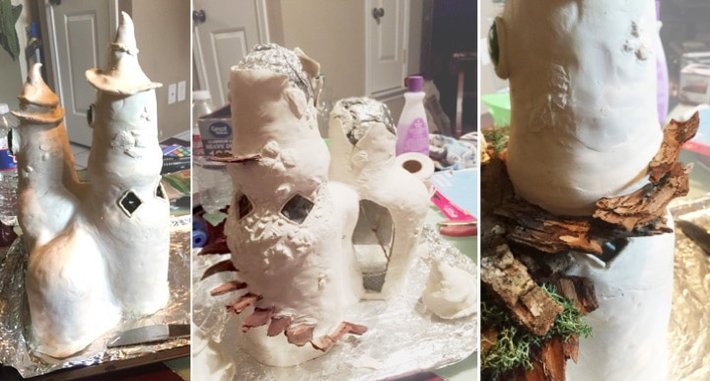
Now that you have an idea of how you want your fairy house to look you can get started gluing everything together. You will want to use aluminum foil to fill in deep crevasses and to shape your roof. I lightly bunched up the foil and then pressed it into the desired location so that I was sure to have a secure fitting piece, then I glued it in place. Don't forget to cover the bottom as well. Check your package for baking instructions. Mine recommended 275 degrees for every 1/4" so I filled out the areas needed to reduce the anticipated clay thickness.
*In my first attempt I had the turrets made from plastic wine glass tops. They melted to I had to pull all the clay off and fill the cavity with foil and try again. So I recommend just using foil to begin with.
Step 5: Sculpt
I have a newly discovered love for polymer clay! There is so much you can do with it. I used plain white Skulpey so it wouldn't distort the pigment when I painted it. I did watch a few YouTube tutorials where they used a stone-like pigmented clay, but with my first attempt I didn't want to get too over-complicated.
*It's important to use polymer and not modeling clay as modeling is oil based and will not dry.
Using your glass or rolling-pin, roll out sheets of clay no thicker than 1/4" or what is suggested on your brand's package. Begin covering the desired areas of the jars and foil, smoothing with fingers as you go, and cutting around the door and window openings. Be creative with the placement of your materials. Think of steps ahead of time so you can mold the clay to go around your desired pieces.
I decided to add a floating staircase up to a balcony on the tallest turret so I built up the clay in these areas and pressed my bark pieces in for an imprint. This will really make it easier to glue them on/in later (see photo below). I wanted to add stone detail in the clay to look as though the stucco was coming off of the stonework. I did this by balling up small scraps of clay and sticking it in small groups around the piece. Using my kabob skewer I shape the rocks while pushing it into the existing clay so it wouldn't cake off while baking.
Step 6: Bake
Once finished, place your house in the oven. My oven is a smaller oven so it was almost too tall. Good idea to check that if you do not have a full size oven before you get too far into your design. Place your fairy house in the oven cold and let it heat up with the oven to what is recommended on your package instructions.
Below you will see how I repaired the turrets. I was lucky to be able to salvage the roof pieces on the turrets so I made sure to blend my fresh clay over and into my hardened clay so it would less likely to crack, and re-baked it for about 10 minutes. Once dry you can start painting and playing with ideas for your roof!
Step 7: Paint
Now that it's cooled it's time to get some color on that baby. I used some generic acrylic paint and watered it down quite a bit. I started with a yellow and brown mix and coated the entire house with it. I decided to use purple as some of my shadows as it's one of my favorite colors. I knew I wanted it to look like it was on the verge of being covered with algae or moss as well, so I mixed a couple shades of green together and started laying them where water would run and in between the rocks and under the steps. I knew I wanted stones around the base as well, so I didn't do too much detailing in those areas and instead began gluing a mix of moss and rocks down. I also attached some sticks to support the roof and front door as well as a wood pile in a one of the little nooks.
Feel free to be creative with your paint. Do graffiti if that's what suits your fancy.
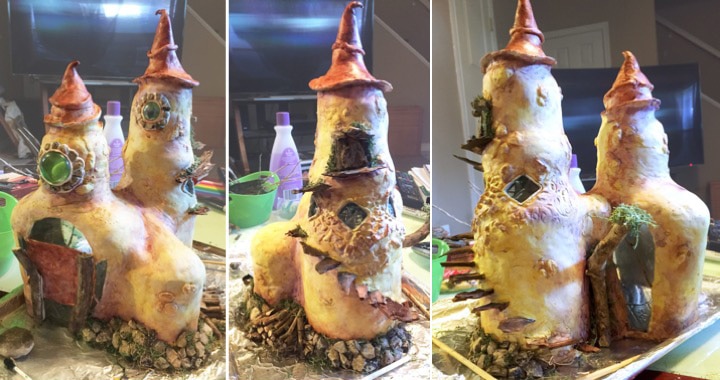
Step 8: Build the Roof
The roof is not as daunting as you might think. Since I wanted mine to have some waves and curves I made a base of layered aluminum foil. Then I drew out the edge shape while it was sitting on the house and trimmed off what I didn't need. I played around with chips of bark in sections beginning just under the balcony and looked for pieced with a curve which would fit snugly up against the side. I placed moss in between the layers of bark to give it depth and hide some of the hot glue. Don't forget to add moss to the edges, especially the inside. It will protect the clay a bit from scratches from the wood and foil as you move and shift things around. Don't forget to cover the underside of the foil roof as well. My roof support twig played in handy for this sloping roof so I made sure it was securely glued into the indention I'd made prior to baking.
Once the base roof is set and no longer needs to come off, you can begin working on the turrets. By building up the tower with foil and the addition of the two lifted edges with clay it made it very simple to glue the bark shingles on. Don't forget to work moss throughout as you did on the lower roof.
I wanted to add a smokestack so I cut a stick with a slight curve and glued it on. Making a small foil cone and gluing that over the top made it easier to attach the bark to such a small space. Cover foil with moss first though.
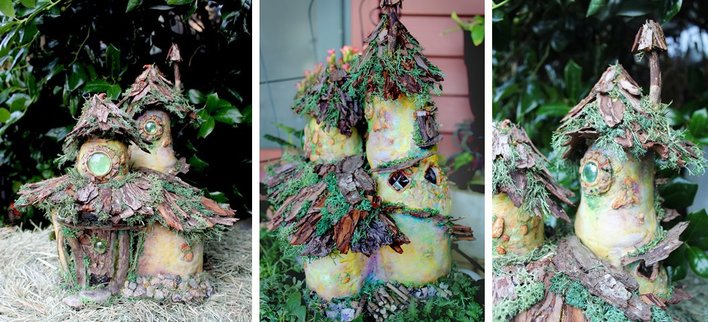
Step 9: Add Details
Now it's time to have fun with the little details. I added pebbles around my green glass vase beads and finely chopped up some moss to stick between the rocks and on top of the steps, so it will blend in with the green I painted already. I also added some bark and rocks around my front and balcony door as well as an awning. The front door needed a bit of detail so I used another green glass bead for some embellishment and added two small pebbles below for door handles.
I also used some watered down acrylic paint for the stain glass. If I had clear nail polish I would have done a top coat so the paint didn't scratch off so easily, but I didn't. I do suggest this if it is going to be moved a lot.
I took some limey green acrylic paint, straight from the tube and hit some highlighted areas on the moss to make it really pop. I also used a gold glitter paint to cover some of the hot glue in places. Nice touch when the light hits.
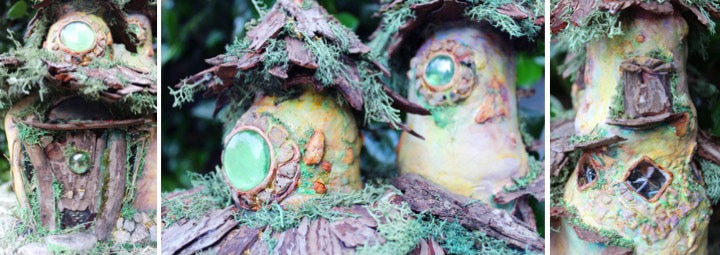
Step 10: Place in Garden
Finally, we get to place it in the garden. I wasn't sure how waterproof my house was going to be so I decided to put it in its own planter to go under my porch. I had bought several types of moss to experiment with and I saved the sheet moss for this step. It easily covered the ground and the battery pack for the fairy lights I hid around the planter. I kept all but 2 of the plants in a planter of their own in case I wanted to change out the flowers. The moss sheets will also make this easier to do.
I added rocks for stepping stones, and even made a little bench with my scraps. Add whatever you think your fairies would like. Rope swings, lanterns, etc.. Have fun and remember it doesn't have to be perfect.

They sky is the limit with your creativity. I've seen them made from entire tree stumps to small doors and windows stuck to trees. Now when I'm walking around I will pick up random things that would be useful for a fairy house. You can do it for pretty much free too without the clay if you want to cover your bottles with rocks.
Embrace mistakes! They sometimes make the most interesting pieces. Have fun!
Embrace mistakes! They sometimes make the most interesting pieces. Have fun!

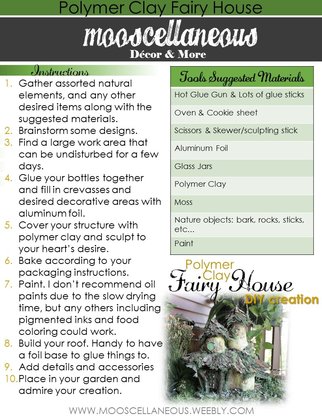
Try this Quick-list Instruction Sheet!
| build_your_fairy_house_-_quick_list.pdf |


 RSS Feed
